
Are you looking to delete your Uber Eats email? Maybe you want to start fresh or you simply no longer use the email associated with your Uber Eats account. Whatever the reason, deleting your Uber Eats email is a straightforward process that can help you maintain control over your online presence.
To delete your Uber Eats email, you’ll need to first access your account settings. Within the settings menu, look for the option to manage your email preferences. From there, you can choose to delete or update your email address. By deleting your Uber Eats email, you can ensure that you won’t receive further communications from Uber Eats to that address.
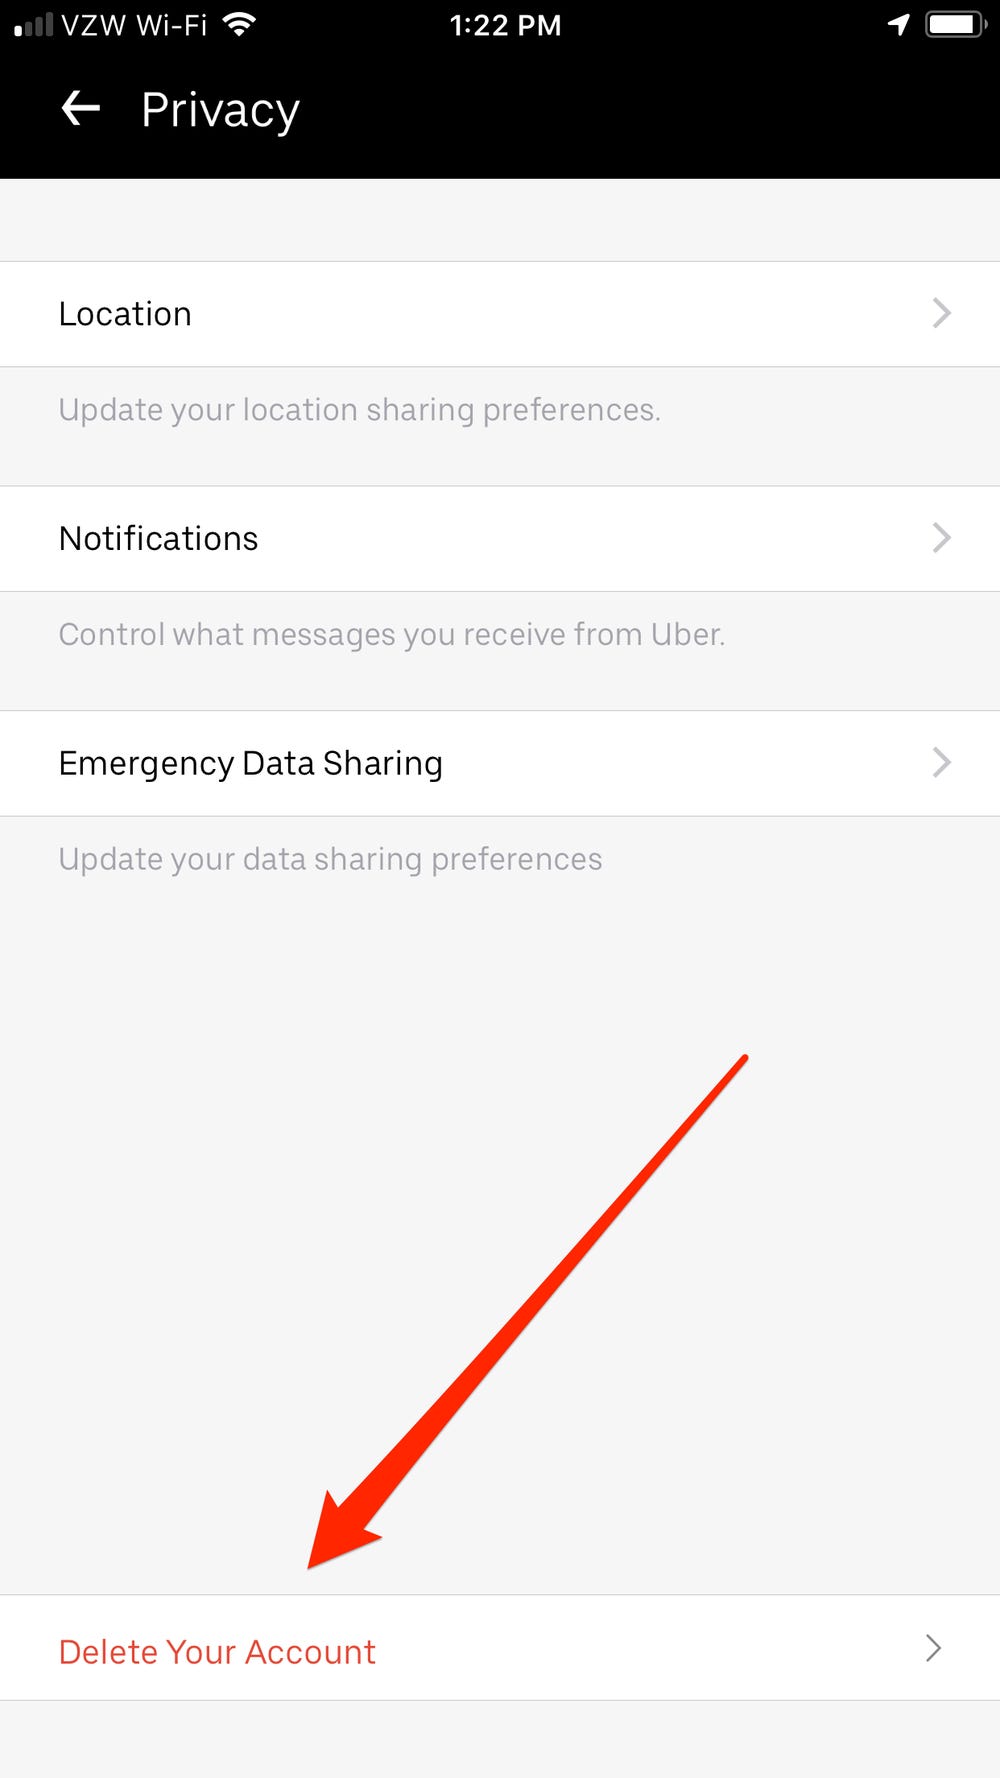
If you want to delete your Uber Eats email, follow these steps. First, open the Uber Eats app on your device. Next, tap on the “Profile” icon in the bottom right corner. Then, select “Settings” from the menu. Scroll down and tap on “Account.” Under the “Account” section, you will find an option to “Delete Account.” Tap on it and follow the prompts to delete your Uber Eats email permanently.
Contents
- 1 Deleting Your Uber Eats Email: A Step-by-Step Guide
- 1.1 Step 1: Open the Uber Eats App
- 1.2 Step 2: Go to Account Settings
- 1.3 Step 3: Select Privacy Options
- 1.4 Step 4: Find the “Delete Account” Option
- 1.5 Step 5: Confirm the Deletion
- 1.6 Step 6: Enter Your Password
- 1.7 Step 7: Delete Your Email Account
- 1.8 Step 8: Verify Deletion
- 1.9 Step 9: Confirm Account Closure
- 1.10 Step 10: Update Your Email Preferences
- 2 Ensuring Your Data Security
- 3 Comparing Food Delivery Services
- 4 Key Takeaways: How to Delete Your Uber Eats Email
- 5 Frequently Asked Questions
- 5.1 1. How can I remove my email address associated with Uber Eats?
- 5.2 2. Can I delete my Uber Eats email permanently?
- 5.3 3. Will deleting my email remove my Uber Eats account?
- 5.4 4. Can I use the same email address for multiple Uber Eats accounts?
- 5.5 5. How do I contact Uber Eats support for help with my email?
Deleting Your Uber Eats Email: A Step-by-Step Guide
If you’re looking to delete your Uber Eats email, whether it’s because you no longer use the service or you simply want to create a new email address, you’ve come to the right place. In this article, we’ll provide you with a step-by-step guide on how to delete your Uber Eats email. By following these instructions, you’ll be able to remove your email from Uber Eats and keep your personal information secure.
Before we dive into the process of deleting your Uber Eats email, it’s important to note that removing your email address from Uber Eats will also delete your associated account and any data linked to it. Make sure to consider this before proceeding with the deletion. Now, let’s get started with the steps.
Step 1: Open the Uber Eats App
The first step to delete your Uber Eats email is to open the Uber Eats mobile app on your device. Make sure you are logged in to your Uber Eats account before proceeding to the next step.
Step 2: Go to Account Settings
Once you’re logged in, navigate to the account settings within the app. You can usually find this option by tapping on your profile icon or by accessing the side menu. Look for the “Account” or “Settings” section, and tap on it to proceed.
Step 3: Select Privacy Options
Within the account settings, locate the privacy or security options. These options may vary depending on your device and app version. Look for any settings related to your email address or account privacy.
Step 4: Find the “Delete Account” Option
Once you’re in the privacy settings, search for the “Delete Account” or “Delete Email” option. This is the option you’ll need to select in order to delete your Uber Eats email.
Step 5: Confirm the Deletion
After selecting the “Delete Account” option, you’ll usually be prompted to confirm your decision. Read through the confirmation message carefully to understand the consequences of deleting your email and account.
Step 6: Enter Your Password
To ensure the security of your account, Uber Eats may require you to enter your password before proceeding with the deletion. This step helps verify your identity and prevents unauthorized account removal.
Step 7: Delete Your Email Account
Once you’ve confirmed your password, you’ll be able to proceed with deleting your Uber Eats email account. Follow the on-screen instructions to complete the deletion process.
Step 8: Verify Deletion
After deleting your email account, you may receive a confirmation email stating that your Uber Eats email has been successfully deleted. This serves as a verification of your account removal.
Step 9: Confirm Account Closure
Double-check that your Uber Eats account has been closed by attempting to log in with your deleted email address. If you receive an error message or are unable to log in, it means that your account closure has been confirmed.
Step 10: Update Your Email Preferences
Now that your Uber Eats email has been deleted, it’s important to update your email preferences on other platforms if you have previously used the same email address. This will ensure that you no longer receive any emails or notifications intended for your deleted Uber Eats account.
Ensuring Your Data Security
Deleting your Uber Eats email is an essential step in maintaining your data security and privacy. By removing your email and associated account, you reduce the risk of unauthorized access to your personal information. It is always good practice to regularly review and update your online accounts, including email addresses, to ensure that your information stays protected.
Remember to update any other platforms or services that may be linked to your deleted email address. This will prevent potential confusion or unauthorized access to your accounts in the future.
By following the step-by-step guide outlined above, you can confidently delete your Uber Eats email and protect your personal information. Don’t forget to regularly review your online accounts to maintain strong data security.
Comparing Food Delivery Services
In recent years, food delivery services have gained immense popularity. If you’re considering switching from Uber Eats to another platform, it’s important to compare your options to find the one that best suits your needs. Here’s a quick comparison of popular food delivery services:
| Food Delivery Service | Availability | Delivery Fees | Special Features |
| Uber Eats | Available in multiple countries | Varies by location and order | Real-time tracking, restaurant ratings |
| DoorDash | Available in select countries | Varies by restaurant | Highly customizable orders |
| Grubhub | Available in the United States | Free delivery options | Rewards program, order tracking |
| Postmates | Available in select cities | Varies by restaurant | Wide variety of delivery options |
Key Takeaways: How to Delete Your Uber Eats Email
- Delete your Uber Eats email by logging into your account, going to the account settings, and selecting the option to delete your email.
- Alternatively, you can contact Uber Eats customer support and request them to delete your email from their records.
- Deleting your Uber Eats email will remove your account and any associated personal information.
- Make sure to consider the consequences of deleting your Uber Eats email, such as losing access to your order history and saved addresses.
- If you no longer want to receive emails from Uber Eats, you can also unsubscribe from their mailing list without deleting your email.
Frequently Asked Questions
In this section, we have provided answers to some common questions related to deleting your Uber Eats email.
1. How can I remove my email address associated with Uber Eats?
If you want to delete your email address that is linked to your Uber Eats account, follow these simple steps:
First, open the Uber Eats app on your device or visit the Uber Eats website on your browser. Sign in to your account using your login credentials.
Next, navigate to your account settings. Look for the “Profile” or “User Settings” option, usually located in the menu or sidebar.
Within the account settings, you should find an option to edit your email address. Click on it to proceed.
Finally, enter your new email address and save the changes. Your previous email address will be replaced with the new one, effectively removing it from your Uber Eats account.
2. Can I delete my Uber Eats email permanently?
While you cannot delete your Uber Eats email permanently, you have the option to update and change the email associated with your account. Follow the steps below:
Open the Uber Eats app or website and log in to your account. Go to your account settings where you can edit your email address.
Click on the option to change your email address and enter the new email you want to use for your Uber Eats account.
Save the changes, and your email address will be updated. The previous email will no longer be associated with your Uber Eats account.
3. Will deleting my email remove my Uber Eats account?
No, deleting your email address associated with Uber Eats will not remove your account. Your account will still exist with the new email address you provide.
If you wish to delete your Uber Eats account entirely, you will need to follow a different process. Please refer to the Uber Eats support documentation or contact their customer service for assistance with deleting your account.
4. Can I use the same email address for multiple Uber Eats accounts?
No, Uber Eats does not allow the use of the same email address for multiple accounts. Each Uber Eats account must have a unique email address associated with it.
If you want to create another Uber Eats account, you will need to use a different email address that is not currently linked to any active Uber Eats accounts.
5. How do I contact Uber Eats support for help with my email?
If you require further assistance with your Uber Eats email or have any other concerns related to your account, you can reach out to Uber Eats support. Here’s how:
Open the Uber Eats app on your device or visit the website and sign in to your account. Navigate to the help or support section.
Here, you should find options for contacting Uber Eats support via email, live chat, or phone. Choose the method that suits you best and follow the instructions provided to get in touch with their support team.
If you want to delete your Uber Eats email, follow these straightforward steps:
- Open your email account and log in to it.
- Locate the email from Uber Eats that you want to delete.
- Click on the email to open it.
- Look for the delete option, usually represented by a trash bin icon.
- Click on the delete option to remove the email from your account.
By following these steps, you can easily delete your Uber Eats email and keep your inbox clean.